import java.io.FileOutputStream;
import java.text.SimpleDateFormat;
import java.util.Date;
import org.apache.poi.ss.usermodel.BorderStyle;
import org.apache.poi.ss.usermodel.CellType;
import org.apache.poi.ss.util.CellRangeAddress;
import org.apache.poi.ss.util.RegionUtil;
import org.apache.poi.xssf.usermodel.XSSFCell;
import org.apache.poi.xssf.usermodel.XSSFCellStyle;
import org.apache.poi.xssf.usermodel.XSSFRow;
import org.apache.poi.xssf.usermodel.XSSFSheet;
import org.apache.poi.xssf.usermodel.XSSFWorkbook;
import org.apache.poi.xssf.usermodel.XSSFWorkbookFactory;
public class Main {
private static XSSFWorkbook book;
private static XSSFSheet sheet;
// *****************************************************
// エントリポイント
// *****************************************************
public static void main(String[] args) {
try {
// ****************************
// ブック作成
// ****************************
book = XSSFWorkbookFactory.createWorkbook();
// ****************************
// シート作成
// ****************************
sheet = book.createSheet("Javaの処理");
// ****************************
// セルに値を直接セット
// ****************************
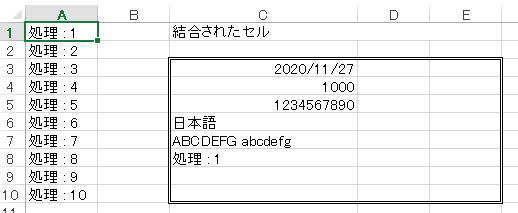
for (int i = 1; i <= 10; i++)
{
cell( sheet, i, 1, String.format("処理 : %d", i ));
}
// ****************************
// セルの幅( 3列目 )
// ****************************
cellWidth( sheet, 3, 6000 );
// ****************************
// セルの結合
// ****************************
cell( sheet, 1, 3, 1, 5 );
// 結合されたセルに値をセット
cell( sheet, 1, 3, "結合されたセル" );
// ****************************
// 日付のセット
// ****************************
SimpleDateFormat dateFormat = new SimpleDateFormat("yyyy/MM/dd");
cell( sheet, 3, 3, dateFormat.parse("2020/11/27") );
// ****************************
// 値のセット
// ****************************
cell( sheet, 4, 3, 1000 );
cell( sheet, 5, 3, 1234567890 );
cell( sheet, 6, 3, "日本語" );
cell( sheet, 7, 3, "ABCDEFG abcdefg" );
// ****************************
// 式のセット
// ****************************
getCell( sheet, 8, 3 ).setCellFormula( "A1" );
// ****************************
// 罫線
// ****************************
cell( sheet, 3, 3, 10, 5, BorderStyle.DOUBLE );
// ****************************
// セルの値を表示
// ****************************
for (int i = 1; i <= 10; i++)
{
System.out.println( cell( sheet, i, 3 ) );
}
// ****************************
// 書き込み用のファイルストリーム
// ****************************
FileOutputStream fos = new FileOutputStream("sample.xlsx");
// ****************************
// 保存と終了
// ****************************
book.write(fos);
book.close();
} catch (Exception e) {
e.printStackTrace();
}
}
// ****************************
// セル( XSSFCell ) を取得
// ****************************
static XSSFCell getCell(XSSFSheet sheet, int row, int col) {
XSSFRow xslRow = sheet.getRow(row - 1);
if ( xslRow == null ) {
// 行を作成
xslRow = sheet.createRow( row - 1 );
}
XSSFCell cell = xslRow.getCell( col - 1 );
if ( cell == null ) {
// セルを作成
cell = xslRow.createCell( col - 1 );
}
return cell;
}
// ****************************
// セルに書き込む
// ****************************
// 文字列
static void cell(XSSFSheet sheet, int row, int col, String value) {
XSSFCell cell = getCell(sheet, row, col);
cell.setCellValue(value);
}
// 数値
static void cell(XSSFSheet sheet, int row, int col, double value) {
XSSFCell cell = getCell(sheet, row, col);
cell.setCellValue(value);
}
// 日付 : BuiltinFormats で定義された値(14) を使用
static void cell(XSSFSheet sheet, int row, int col, Date value) {
XSSFCell cell = getCell(sheet, row, col);
XSSFCellStyle style = sheet.getWorkbook().createCellStyle();
// Class BuiltinFormats より "m/d/yy"
style.setDataFormat(14);
cell.setCellStyle(style);
cell.setCellValue(value);
}
// ****************************
// セル読み込む
// ****************************
static String cell(XSSFSheet sheet, int row, int col) {
XSSFRow xslRow = sheet.getRow(row - 1);
if ( xslRow == null ) {
return "";
}
XSSFCell cell = xslRow.getCell( col - 1 );
if ( cell == null ) {
return "";
}
CellType type = cell.getCellType();
// 文字列
if ( type == CellType.STRING ) {
return cell.getStringCellValue();
}
if ( type == CellType.NUMERIC ) {
// 日付
if( org.apache.poi.ss.usermodel.DateUtil.isCellDateFormatted(cell) ) {
SimpleDateFormat sdf = new SimpleDateFormat( "yyyy/MM/dd HH:mm:ss" );
return sdf.format( cell.getDateCellValue() );
}
// 数値
else {
return String.format("%f", cell.getNumericCellValue());
}
}
// 式
if ( type == CellType.FORMULA ) {
return cell.getCellFormula();
}
String result = cell.getRawValue();
if ( result == null ) {
result = "";
}
return result;
}
// ****************************
// セルの幅
// ****************************
static void cellWidth(XSSFSheet sheet, int col, int width) {
sheet.setColumnWidth(col-1, width);
}
// ****************************
// セルの結合
// ****************************
static void cell(XSSFSheet sheet, int row1, int col1, int row2, int col2) {
sheet.addMergedRegion( new CellRangeAddress(row1-1, row2-1, col1-1, col2-1) );
}
// ****************************
// 範囲の外側の罫線
// ****************************
static void cell(XSSFSheet sheet, int row1, int col1, int row2, int col2, BorderStyle borderStyle ) {
CellRangeAddress region = new CellRangeAddress(row1-1, row2-1, col1-1, col2-1);
RegionUtil.setBorderTop( borderStyle, region, sheet );
RegionUtil.setBorderBottom( borderStyle, region, sheet );
RegionUtil.setBorderLeft( borderStyle, region, sheet );
RegionUtil.setBorderRight( borderStyle, region, sheet );
}
}
Apache POI Apache Commons Collections Apache Commons Compress 4.1 ドキュメント

 WindowBuilder のインストール
SWT と Swing に関しては、
WindowBuilder のインストール
SWT と Swing に関しては、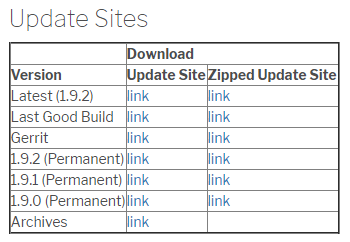 ※ バージョンは、WindowBuilder のバージョンです。(Eclipse のバージョンに依存しなくなりました)
この URL を『新規ソフトウェアのインストール』で表示されるダイアログに入力します
※ バージョンは、WindowBuilder のバージョンです。(Eclipse のバージョンに依存しなくなりました)
この URL を『新規ソフトウェアのインストール』で表示されるダイアログに入力します

 プロジェクト作成
プロジェクトは専用のものを使いますので、『その他』から以下を選択して下さい。
プロジェクト作成
プロジェクトは専用のものを使いますので、『その他』から以下を選択して下さい。
 プロジェクトを作成したら、CTRL+N でその他より、以下を選択して下さい。
 実行してウインドウが表示されたら準備完了です。
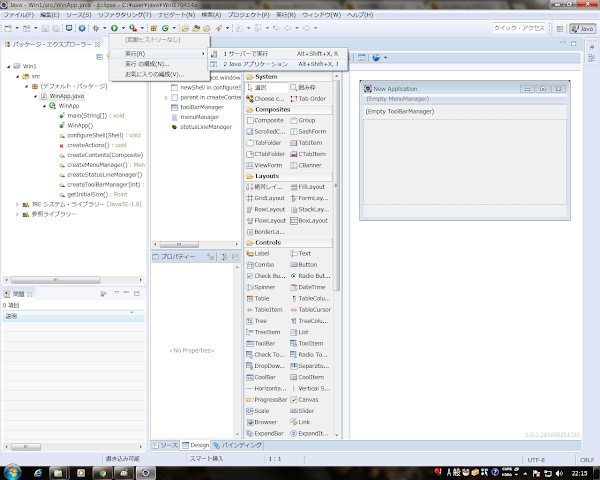 テンプレートの修正
メニューバー・タスクバー・ツールバー用のテンプレートは邪魔なだけなので削除します。
MySQL 接続用ライブラリのインストール
テンプレートの修正
メニューバー・タスクバー・ツールバー用のテンプレートは邪魔なだけなので削除します。
MySQL 接続用ライブラリのインストール