最新の Excel( .xslx ) 用 XSSF に必要な jar


Apache POI

Apache Commons Collections

Apache Commons Compress

4.1 ドキュメント

サンプル
オーバーロードを使用して、できるだけ cell というメソッドでできるようにしてみました。Microsoft の仕様に合わせて行や列を 1 始まりにしたかったという意図もあります。
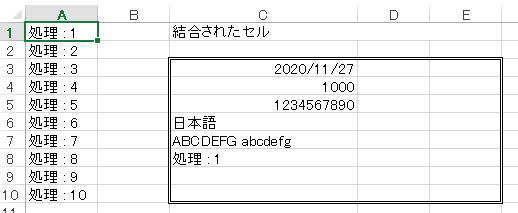
001.import java.io.FileOutputStream;002.import java.text.SimpleDateFormat;003.import java.util.Date;004. 005.import org.apache.poi.ss.usermodel.BorderStyle;006.import org.apache.poi.ss.usermodel.CellType;007.import org.apache.poi.ss.util.CellRangeAddress;008.import org.apache.poi.ss.util.RegionUtil;009.import org.apache.poi.xssf.usermodel.XSSFCell;010.import org.apache.poi.xssf.usermodel.XSSFCellStyle;011.import org.apache.poi.xssf.usermodel.XSSFRow;012.import org.apache.poi.xssf.usermodel.XSSFSheet;013.import org.apache.poi.xssf.usermodel.XSSFWorkbook;014.import org.apache.poi.xssf.usermodel.XSSFWorkbookFactory;015. 016.public class Main {017. 018. private static XSSFWorkbook book;019. private static XSSFSheet sheet;020. 021. // *****************************************************022. // エントリポイント023. // *****************************************************024. public static void main(String[] args) {025. try {026. // ****************************027. // ブック作成028. // ****************************029. book = XSSFWorkbookFactory.createWorkbook();030. 031. // ****************************032. // シート作成033. // ****************************034. sheet = book.createSheet("Javaの処理");035. 036. // ****************************037. // セルに値を直接セット038. // ****************************039. for (int i = 1; i <= 10; i++)040. {041. cell( sheet, i, 1, String.format("処理 : %d", i ));042. }043. 044. // ****************************045. // セルの幅( 3列目 )046. // ****************************047. cellWidth( sheet, 3, 6000 );048. 049. // ****************************050. // セルの結合051. // ****************************052. cell( sheet, 1, 3, 1, 5 );053. // 結合されたセルに値をセット054. cell( sheet, 1, 3, "結合されたセル" );055. 056. // ****************************057. // 日付のセット058. // ****************************059. SimpleDateFormat dateFormat = new SimpleDateFormat("yyyy/MM/dd");060. cell( sheet, 3, 3, dateFormat.parse("2020/11/27") );061. 062. // ****************************063. // 値のセット064. // ****************************065. cell( sheet, 4, 3, 1000 );066. cell( sheet, 5, 3, 1234567890 );067. cell( sheet, 6, 3, "日本語" );068. cell( sheet, 7, 3, "ABCDEFG abcdefg" );069. 070. // ****************************071. // 式のセット072. // ****************************073. getCell( sheet, 8, 3 ).setCellFormula( "A1" );074. 075. // ****************************076. // 罫線077. // ****************************078. cell( sheet, 3, 3, 10, 5, BorderStyle.DOUBLE );079. 080. // ****************************081. // セルの値を表示082. // ****************************083. for (int i = 1; i <= 10; i++)084. {085. System.out.println( cell( sheet, i, 3 ) );086. }087. 088. // ****************************089. // 書き込み用のファイルストリーム090. // ****************************091. FileOutputStream fos = new FileOutputStream("sample.xlsx");092. 093. // ****************************094. // 保存と終了095. // ****************************096. book.write(fos);097. book.close();098. 099. } catch (Exception e) {100. 101. e.printStackTrace();102. 103. }104. 105. }106. 107. // ****************************108. // セル( XSSFCell ) を取得109. // ****************************110. static XSSFCell getCell(XSSFSheet sheet, int row, int col) {111. 112. XSSFRow xslRow = sheet.getRow(row - 1);113. if ( xslRow == null ) {114. // 行を作成115. xslRow = sheet.createRow( row - 1 );116. }117. 118. XSSFCell cell = xslRow.getCell( col - 1 );119. if ( cell == null ) {120. // セルを作成121. cell = xslRow.createCell( col - 1 );122. }123. return cell;124. 125. }126. // ****************************127. // セルに書き込む128. // ****************************129. // 文字列130. static void cell(XSSFSheet sheet, int row, int col, String value) {131. 132. XSSFCell cell = getCell(sheet, row, col);133. cell.setCellValue(value);134. 135. }136. // 数値137. static void cell(XSSFSheet sheet, int row, int col, double value) {138. 139. XSSFCell cell = getCell(sheet, row, col);140. cell.setCellValue(value);141. 142. }143. // 日付 : BuiltinFormats で定義された値(14) を使用144. static void cell(XSSFSheet sheet, int row, int col, Date value) {145. 146. XSSFCell cell = getCell(sheet, row, col);147. XSSFCellStyle style = sheet.getWorkbook().createCellStyle();148. // Class BuiltinFormats より "m/d/yy"149. style.setDataFormat(14);150. cell.setCellStyle(style);151. cell.setCellValue(value);152. 153. }154. 155. // ****************************156. // セル読み込む157. // ****************************158. static String cell(XSSFSheet sheet, int row, int col) {159. 160. XSSFRow xslRow = sheet.getRow(row - 1);161. if ( xslRow == null ) {162. return "";163. }164. 165. XSSFCell cell = xslRow.getCell( col - 1 );166. if ( cell == null ) {167. return "";168. }169. 170. CellType type = cell.getCellType();171. // 文字列172. if ( type == CellType.STRING ) {173. return cell.getStringCellValue();174. } 175. if ( type == CellType.NUMERIC ) {176. // 日付177. if( org.apache.poi.ss.usermodel.DateUtil.isCellDateFormatted(cell) ) {178. SimpleDateFormat sdf = new SimpleDateFormat( "yyyy/MM/dd HH:mm:ss" );179. return sdf.format( cell.getDateCellValue() );180. }181. // 数値182. else {183. return String.format("%f", cell.getNumericCellValue());184. }185. } 186. // 式187. if ( type == CellType.FORMULA ) {188. return cell.getCellFormula();189. }190. 191. String result = cell.getRawValue();192. if ( result == null ) {193. result = "";194. }195. 196. return result;197. 198. }199. 200. // ****************************201. // セルの幅202. // ****************************203. static void cellWidth(XSSFSheet sheet, int col, int width) {204. 205. sheet.setColumnWidth(col-1, width);206. 207. }208. 209. // ****************************210. // セルの結合211. // ****************************212. static void cell(XSSFSheet sheet, int row1, int col1, int row2, int col2) {213. 214. sheet.addMergedRegion( new CellRangeAddress(row1-1, row2-1, col1-1, col2-1) );215. 216. }217. 218. // ****************************219. // 範囲の外側の罫線220. // ****************************221. static void cell(XSSFSheet sheet, int row1, int col1, int row2, int col2, BorderStyle borderStyle ) {222. 223. CellRangeAddress region = new CellRangeAddress(row1-1, row2-1, col1-1, col2-1);224. 225. RegionUtil.setBorderTop( borderStyle, region, sheet );226. RegionUtil.setBorderBottom( borderStyle, region, sheet );227. RegionUtil.setBorderLeft( borderStyle, region, sheet );228. RegionUtil.setBorderRight( borderStyle, region, sheet );229. 230. }231. 232.}実行結果

読込みは以下のような感じで
XSSFWorkbook book = XSSFWorkbookFactory.createWorkbook(new FileInputStream("sample.xlsx"));関連する記事
JScript : Excel の新しいブックのデフォルトのシートのセルに直接値をセットして、オートフィルを Range オブジェクトから実行する
C# : Excel の新しいブックのデフォルトのシートのセルに直接値をセットして、オートフィルを Range オブジェクトから実行する
Python : Excel の新しいブックのデフォルトのシートのセルに直接値をセットして、オートフィルを Range オブジェクトから実行する
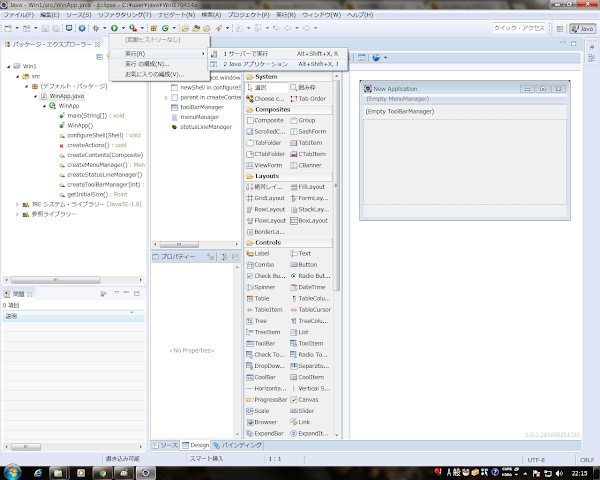
 WindowBuilder のインストール
SWT と Swing に関しては、
WindowBuilder のインストール
SWT と Swing に関しては、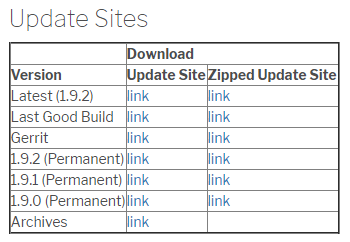 ※ バージョンは、WindowBuilder のバージョンです。(Eclipse のバージョンに依存しなくなりました)
この URL を『新規ソフトウェアのインストール』で表示されるダイアログに入力します
※ バージョンは、WindowBuilder のバージョンです。(Eclipse のバージョンに依存しなくなりました)
この URL を『新規ソフトウェアのインストール』で表示されるダイアログに入力します