001.
002.
003.
004.Dim Fs,Stream
005.Dim InFile
006.Dim Kana
007.Dim KjFlg
008.Kana = Array( _
009."。","「","」","、","・","ヲ","ァ","ィ","ゥ","ェ","ォ","ャ","ュ","ョ","ッ", _
010."ー","ア","イ","ウ","エ","オ","カ","キ","ク","ケ","コ","サ","シ","ス","セ","ソ", _
011."タ","チ","ツ","テ","ト","ナ","ニ","ヌ","ネ","ノ","ハ","ヒ","フ","ヘ","ホ","マ", _
012."ミ","ム","メ","モ","ヤ","ユ","ヨ","ラ","リ","ル","レ","ロ","ワ","ン","゙","゚" )
013.
014.Set Fs = CreateObject( "Scripting.FileSystemObject" )
015.Set Stream = CreateObject("ADODB.Stream")
016.
017.InFile = WScript.Arguments(0)
018.
019.Dim LineBuffer,DispBuffer,CWork,nCnt,strBuff,i,j
020.
021.if not Fs.FileExists( InFile ) then
022. Wscript.Echo "ファイルが存在しません"
023. Wscript.Quit
024.end if
025.
026.
027.
028.Stream.Open
029.
030.
031.
032.Stream.Type = 1
033.
034.
035.
036.Stream.LoadFromFile InFile
037.
038.
039.
040.Bcnt = 0
041.nCnt = 0
042.KjFlg = ""
043.
044.Do while not Stream.EOS
045.
046. if ( nCnt MOD 16 ) = 0 then
047. Wscript.Echo " 0 1 2 3 4 5 6 7" _
048. & " 8 9 A B C D E F"
049. Wscript.Echo "--------------------------------" _
050. & "------------------------------------------"
051. end if
052.
053.
054. LineBuffer = Stream.Read(16)
055.
056. strBuff = ""
057. For i = 1 to LenB( LineBuffer )
058. CWork = MidB(LineBuffer,i,1)
059. Cwork = AscB(Cwork)
060. Cwork = Hex(Cwork)
061. Cwork = Ucase(Cwork)
062. Cwork = Right( "0" & Cwork, 2 )
063. DispBuffer = DispBuffer & Cwork & " "
064. strBuff = strBuff & CharConv( Cwork )
065. Next
066.
067. Wscript.Echo _
068. Right( _
069. "00000000" & Ucase(Hex( nCnt * 16 )), 8 _
070. ) & " " & _
071. Left(DispBuffer & String(49," "), 49 ) & strBuff
072. DispBuffer = ""
073.
074. nCnt = nCnt + 1
075.
076.Loop
077.
078.
079.
080.Stream.Close
081.
082.Set Stream = Nothing
083.Stream = Empty
084.Set Fs = Nothing
085.Fs = Empty
086.
087.
088.
089.
090.function CharConv( HexCode )
091.
092. Dim nCode
093.
094. nCode = Cint( "&H" & HexCode )
095.
096. if KjFlg = "" then
097. if &H81 <= nCode and nCode <= &H84 or _
098. &H88 <= nCode and nCode <= &H9f or _
099. &HE0 <= nCode and nCode <= &HEA then
100. KjFlg = HexCode
101. CharConv = ""
102. Exit Function
103. end if
104. else
105. if HexCode <> "00" then
106. KjFlg = KjFlg & HexCode
107. CharConv = Chr( Cint( "&H" & KjFlg ) )
108. else
109. CharConv = ".."
110. end if
111. KjFlg = ""
112. Exit Function
113. end if
114.
115. if 0 <= nCode and nCode <= &H1F then
116. CharConv = "."
117. end if
118. if &H20 <= nCode and nCode <= &H7E then
119. CharConv = Chr(nCode)
120. end if
121. if &H7F <= nCode and nCode <= &HA0 then
122. CharConv = "."
123. end if
124. if &HA1 <= nCode and nCode <= &HDF then
125. CharConv = Kana(nCode-&HA1)
126. end if
127. if &HE0 <= nCode and nCode <= &HFF then
128. CharConv = "."
129. end if
130.
131.end function

 例えば...
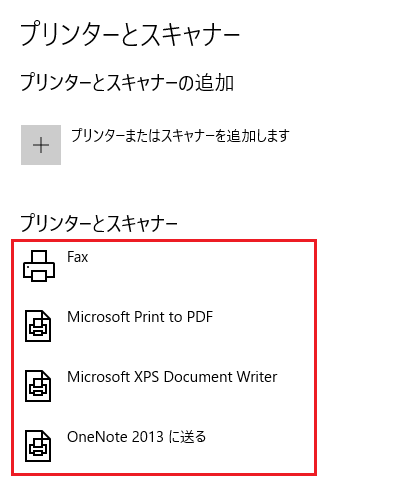 ※ 一覧なので、cscript.exe PrinterList.vbs としたほうがいいでしょう。( スクリプトでは、Wscript.exe で実行した場合 コマンドプロンプトを開いて Cscript.exe で実行しなおすようになっています )
 item.Name は FolderItem オブジェクトのプロパティです
 レジストリで設定した内容を Windows に即時に反映させる必要がある時に使用します。
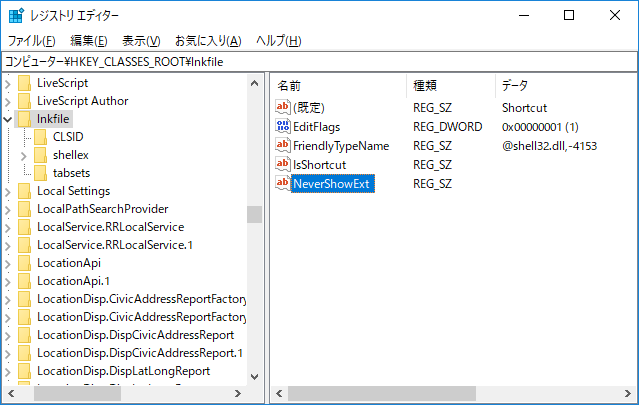
例えばショートカットのファイルは拡張子 .lnk が付いているのですが、一般的に表示される事はありません。これを表示させるには簡単で、手動でレジストリの
レジストリで設定した内容を Windows に即時に反映させる必要がある時に使用します。
例えばショートカットのファイルは拡張子 .lnk が付いているのですが、一般的に表示される事はありません。これを表示させるには簡単で、手動でレジストリの  ※ コマンドプロンプトのプロパティで、簡易編集モードを ON にして、範囲をドラッグして右クリックでコピーできます。
※ コマンドプロンプトならば、『reg query HKLM\SOFTWARE\Wow6432Node\ODBC\ODBCINST.INI』ですから、リダイレクトしてファイルに表示結果を書き込めばいいでしょう( 但し、キーが全て表示されるのでとても見にくいです )
※ コマンドプロンプトのプロパティで、簡易編集モードを ON にして、範囲をドラッグして右クリックでコピーできます。
※ コマンドプロンプトならば、『reg query HKLM\SOFTWARE\Wow6432Node\ODBC\ODBCINST.INI』ですから、リダイレクトしてファイルに表示結果を書き込めばいいでしょう( 但し、キーが全て表示されるのでとても見にくいです )
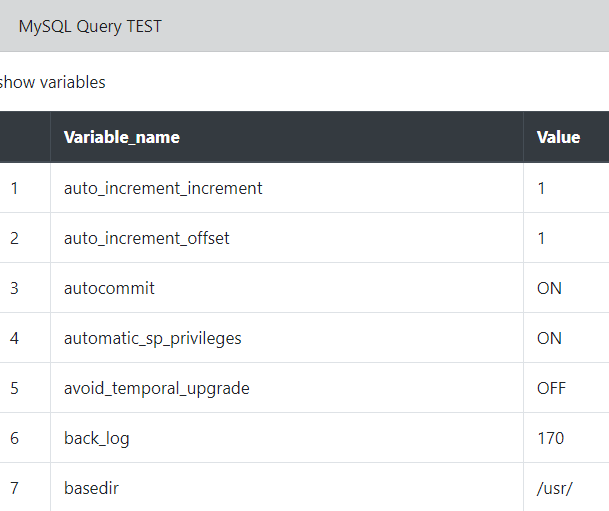 ※ $_GET['text'] で入力された SQL が引き渡されます。
※ GET コマンドなので、IE11 以外ならば SQLは アドレスバーで直接入力ができると思います。
※ php-mysql-test.php?text=SQL文
テーブルの表現には Bootstrap を使用しています( 一応スマホではテーブル部分のみ横スクロールします )
QueryString に text が無い場合と text に有効な文字が全く無い場合は
※ $_GET['text'] で入力された SQL が引き渡されます。
※ GET コマンドなので、IE11 以外ならば SQLは アドレスバーで直接入力ができると思います。
※ php-mysql-test.php?text=SQL文
テーブルの表現には Bootstrap を使用しています( 一応スマホではテーブル部分のみ横スクロールします )
QueryString に text が無い場合と text に有効な文字が全く無い場合は 
 ※コマンドプロンプトの操作
Q : 終了します。
スペースキー : 次ページを表示します。
Enterキー : 次の行を表示します
※コマンドプロンプトの操作
Q : 終了します。
スペースキー : 次ページを表示します。
Enterキー : 次の行を表示します
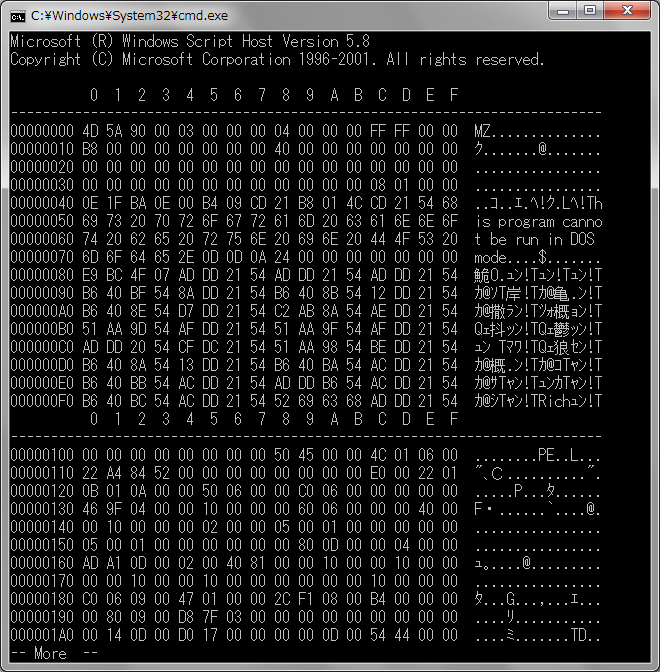
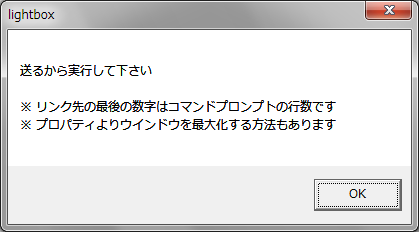
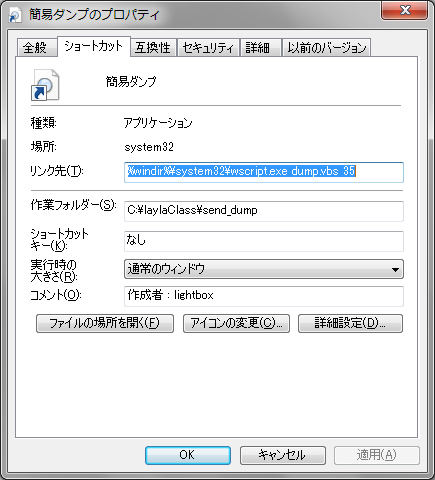 この時、作業フォルダーを用意してそこに VBScript のコードファイルを保存します。実行するコマンドラインは以下のようになっています。
 最大化は、dump.vbs の 17行目からを、画面の解像度に合わせてカラム数を以下のように設定して実行時のウインドウを選択すると実装できます( ただ、ダンプの表示幅が決まっているのでこの場合あまり意味ありません )
strCommand = "cmd /c mode
最大化は、dump.vbs の 17行目からを、画面の解像度に合わせてカラム数を以下のように設定して実行時のウインドウを選択すると実装できます( ただ、ダンプの表示幅が決まっているのでこの場合あまり意味ありません )
strCommand = "cmd /c mode 
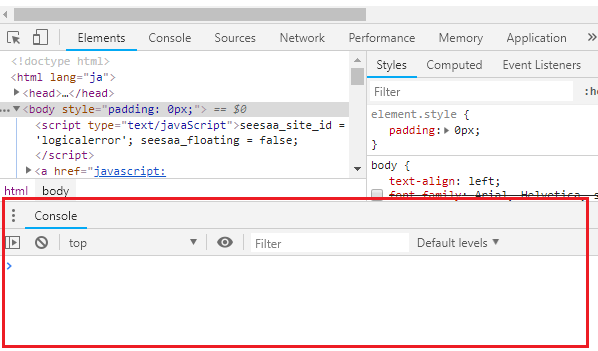 ESC で表示・非表示が切り替えられます。
リロードボタン長押しでオプションメニュー
ESC で表示・非表示が切り替えられます。
リロードボタン長押しでオプションメニュー
 デベロッパーツールが開いている状態でのみ、メニューが表示されてリロード方法を選択できるようになります。特に、最後の『キャッシュの消去とハード再読み込み』は、ショートカットキーが無いのでこのメニューからのみ利用できます。
ドラッグ & ドロップで要素を移動
デベロッパーツールが開いている状態でのみ、メニューが表示されてリロード方法を選択できるようになります。特に、最後の『キャッシュの消去とハード再読み込み』は、ショートカットキーが無いのでこのメニューからのみ利用できます。
ドラッグ & ドロップで要素を移動
 ドラッグで top_1 の div を移動中です。ドロップすると移動され、CTRL+Z で元に戻ります
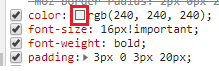
CSS のカラーフォーマットをその場で変更表示
カラー部分を、SHIFT を押しながらクリックすると、フォーマットが切り替わって循環します。
ドラッグで top_1 の div を移動中です。ドロップすると移動され、CTRL+Z で元に戻ります
CSS のカラーフォーマットをその場で変更表示
カラー部分を、SHIFT を押しながらクリックすると、フォーマットが切り替わって循環します。
 複数の JavaScript ソースより文字列検索
 JavaScript の整形
 ソースのスペースの表示
F1 で settings を開きます
ソースのスペースの表示
F1 で settings を開きます
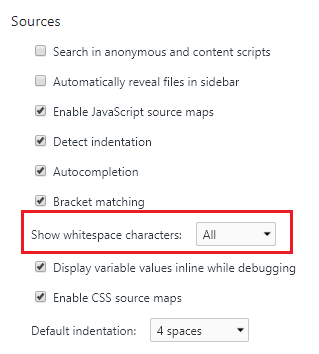 ▼ スペース
 ▼ タブ
▼ タブ
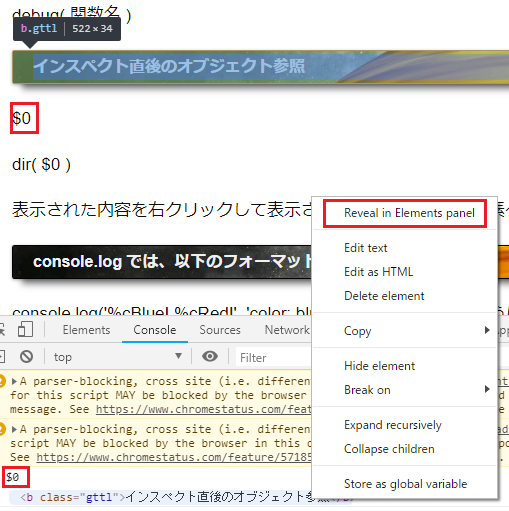
 コンソールから関数のブレイクポイント作成
 console.log では、以下のフォーマット文字列が使えます
console.log('%cBlue! %cRed!', 'color: blue;', 'color: red;'); のように複数も可
console.log では、以下のフォーマット文字列が使えます
console.log('%cBlue! %cRed!', 'color: blue;', 'color: red;'); のように複数も可
 その他
その他